How to create an online course in 5 easy steps

Creating content can be daunting, but it doesn’t have to be!

Originally posted to: https://elearningindustry.com/simple-steps-create-online-content

Everyone knows that creating any type of content can be daunting.

And of course, even more so for those dipping their toes in for the first time.

But have no fear, because it doesn’t need to be this way.

We’ve put together a simple, 5 step guide to take you from idea in your head through to rolling out the best, most amazing courses you can imagine.

It's easier than you think to create and deliver your own beautiful online courses like this!
It’s easier than you think to create and deliver your own beautiful online courses like this!


We recommend that if you are in the stage of creating you, or will be in the near future, you have a pen and paper ready (or a simple LMS platform).

This way you can follow along with this guide and use it as a step by step tutorial to help get you started.

That way, at the end, you’ll have a complete plan on how to create your best, or first, course yet!

With that being said, let’s jump right into it!

Editors NOTE: If you don’t have software to follow along and create your online course with, you can get started for free with Wyzed’s easy online training software.


Step 1 – Define your learning outcomes

Often when it comes to creating courses, people just jump right into glueing the content together.

But no matter how much you think you need the course or have built content before, Step 1 deserves the same time and attention for every single course you will ever build.

Because, if you set off in the wrong direction, it can turn in 10x more work for you down the line, or even mean you have to start over and lose all your work.

So,

is all about defining your objectives.

Now, this might be obvious and you might be thinking, “Dustin, I need them complete this software training course.” Or “I need them to learn my policies and procedures in our business.”

Or maybe even “ I need them to complete this course on developing a profitable small business.” etc etc etc.

But before you skip past this section, or maybe jump over to your preferred social media of choice, hear me out for a second.


How to define your learning objectives

Defining our learning objectives is as simple as asking the following two questions:

  • Why do your learners need this course? (Look past the what they need to learn and think deeply about why they need to learn it).
  • Why is this information important/of interest to your learners?

In other words, we need to know what specific tasks or activities they’ll be able to complete after finishing the course or courses.

So for example, why do they need to learn those particular policies and procedures and why is that outcome important?

What will that knowledge allow them to do/complete/achieve and why will that help them with their jobs?

Or how about the course for small business owners, will they become better leaders or financial managers or sales people?

By focusing, and breaking down the why we start to get really clear on what the outcomes should be from our learners taking the course.

This will make sure that we have clarity when it comes to evaluating what content we need later down in the process and to avoid any unnecessary content that is not adding meaningful value to what you’re creating or someone is taking time to learn.


Why is your course important to your users?

Another really important part of this process, and related to that second why is looking at why that is important.

Now, you may be clear about this step, but it’s important to make sure that your learners are equally as clear, which is not always a given.

In this step, don’t be afraid to just straight out ask them and engage them about what you want them to learn. After all, it is for them isn’t it?

A critical principle of adult learning is that they need to see and understand the value of taking the course.

We may have the power to compel the in our organisations to have them complete the learning, but you will find substantially higher levels of engagement when we can clearly articulate this information to our learners.

So, don’t be afraid to start your courses with telling users:

  • How this will help them meet their needs
  • How this course is relevant
  • Why this course course is important in a way that is meaningful to them
  • And how by them learning this course and absorbing the content, they will achieve their goals


Step 2 – Define WHO the learning is for

Often times, the people we are creating the content for, aren’t like us.

We can sometimes forget that while we may be experts in what we are trying to teach, and have our own preferred way to learn, that doesn’t necessarily mean that our way is going to be the best way to connect that information with our learners.

So once we’ve boiled our learning objectives in Step 1, we want to make sure that everything we create in future steps is tailored to our learners.

This might be both in the information provided to them but also things like the language we use, or the level of sophistication we might built in to our Learning Management System.

Many people still don’t even use computers very often as an example, so we need to be understand these details before we proceed to our next step.

For example, ever notice how some people say they need to write things down,  or others say that they need to hear it out loud, and others just need to get hands on with whatever they’re learning?


Choose the correct multimedia for your learner type

You probably yourself, in that list, picked out your favourite way to learn.

Well, our learners are no different as everyone has a different modalities, a fancy way of saying style of learning, so we need to make sure that we craft our content to meet that.

So, you might make sure you have a mix of video content, or text and pictures, which touches on the visual and auditory modalities.

You can have some content where the learner needs to explain the concepts back or even actually execute the tasks themselves and then provide some proof of their activities getting their hands dirty, so to speak for our kinaesthetically inclined learners.

By making sure we provide a range of elements in our learning, we make sure that we can cater to our different learnings learning style.


How to define who your learning is for

To help guide you through Step 2, think about, and even go ask some of your intended learners these questions:What is the level of education my learners have going through this course

  • What is their general level of comfort with technology?
  • Have they completed eLearning before?
  • And if they have, what did they learn and through what elements?
  • How have they learned in the past outside of any LMS? (i.e. University education or making technical training, etc?)
  • What is their level of understanding or experience with the learning objectives from Step 1?
  • Do they know some of the language or terminology of what is being taught?
  • When they’re learning, do they prefer to write things down, practice the things they’ve learned, or are happy to just listen and absorb that information in?

Once you’ve asked these questions you should have a far clearer idea of who your course is for and what content and approach will appeal to them most.


Step 3 – Map out your content

Phew!! We’ve made it this far and it’s all starting to come together now.

So far, we’ve distilled down our learning objectives, gotten into the minds of our learners, and now we’re getting ready to start assembling the skeleton of our course.

But before we get too far ahead of ourselves, this is another common mistake I see when people start to create courses.

They just create content, or repurpose content and start whacking it into courses without a framework or overall vision for how the course will work.

This is the equivalent of starting to build a house without any blueprints. You wouldn’t do that would you? So why would we want to build a course without the very same blueprint.

The good news is that this is a fairly easy step, especially with the clarity from earlier steps, so let’s get started and can be broken down into two parts.


How to Map out your content

The first part is to think broadly about how the content can be arranged to help us achieve Step 1 in accordance with Step 2.

How might we do that you ask?

Good question!

By looking at something like Bloom’s Taxonomy, it can give us a way to think about our teaching and a guide to to arrange our content.

How to map out your content using a diagram.

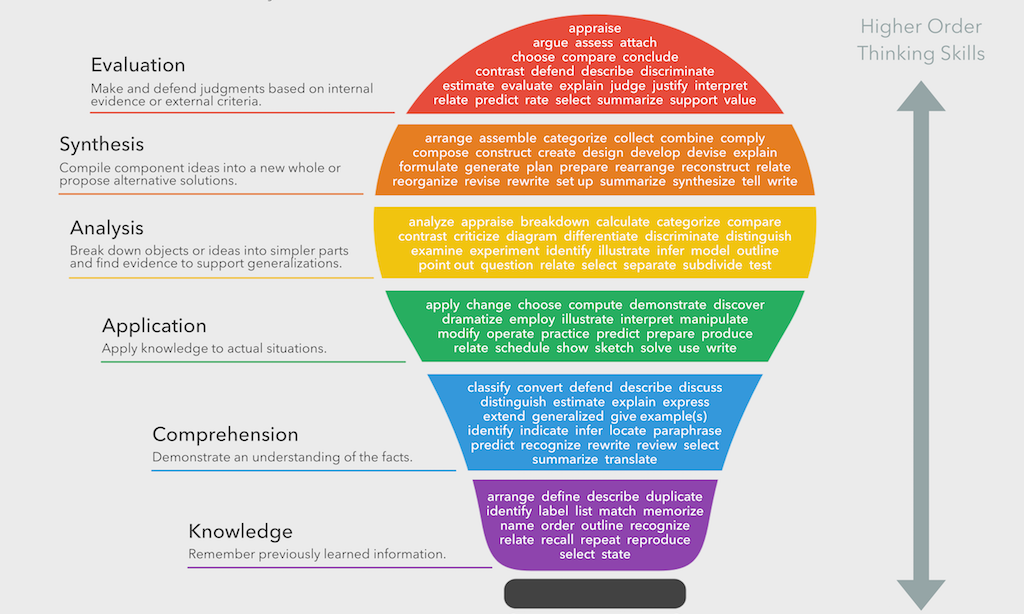
Photo Credit: https://www.teachthought.com/learning/what-is-blooms-taxonomy-a-definition-for-teachers/

So the TD;LR of Bloom’s Taxonomy is that it gives us a structure of how to push our learning towards higher levels of thinking.

This will ultimately ensure that our learners have the greatest level of comprehension and retention about the information we want them to have.

Another way to explain this to state that if the learner can apply the learning to actual situations or make and defend arguments about the learning, it is ultimately better than if they can just memorised definitions.

Next, we want to think about the best way to organise our content.


How to organise your content

For this step, I suggest using word document or make sure you have a blank page as this step can grow.

Next, we can think about our course and content in three different levels which we will visually show as different indented line of text.

One header will be for the Header which will be a group of topics clustered together based on content or learning objectives.

This makes allows the leaner to see learning progressing based on a number of smaller concepts.

The next is the Topic which will house all of our elements and can be thought of like a chapter in a book.

And lastly, our Elements which are our videos, text fields, forums, multiple choice questions, etc which help to provide learning or validate that the learning has happened.

So it might look something like this:

Header:

  • Topic
    • Element
    • Element
    • Element
  • Topic
    • Element
    • Element
    • Element

And from here, and with Step 1 and Step 2 in mind, we can start to construct what we need to assemble.


Here’s how your content should be structured

How to Create Killer Courses [Header]

  • How to Build Multiple Choice Questions [Topic]
    • Text explanation of what a multiple choice question is, the different types and when it should be used [Element]
    • Quick video on how to put the multiple choice questions into the system and a run through of how to select the different types [Element]
    • A picture of an example [Element]
    • Another picture example [Element]
    • 3 – 4 multiple choice questions related to the learning above [Element]
  • How to use long form questions [Topic]
    • Text explanation of what it is and give a few different examples of when it might be used and the reasons why behind selecting each one [Element]
    • A link to an article on the subject for further advanced reading [Element]
    • A video on how to put in a long form question into the system and a quick run through of the functionality [Element]
    • Text examples to help give reference to the learner [Element]
    • A long form question with a scenario for the learner to create their own questions and explain why they might use that one [Element]

Wyzed Top Tip: Don’t forget to keep asking yourselves the Questions from Step 1. Sometimes once we start to map out the content, the answers might change which allow us to make tweaks to our plans. 

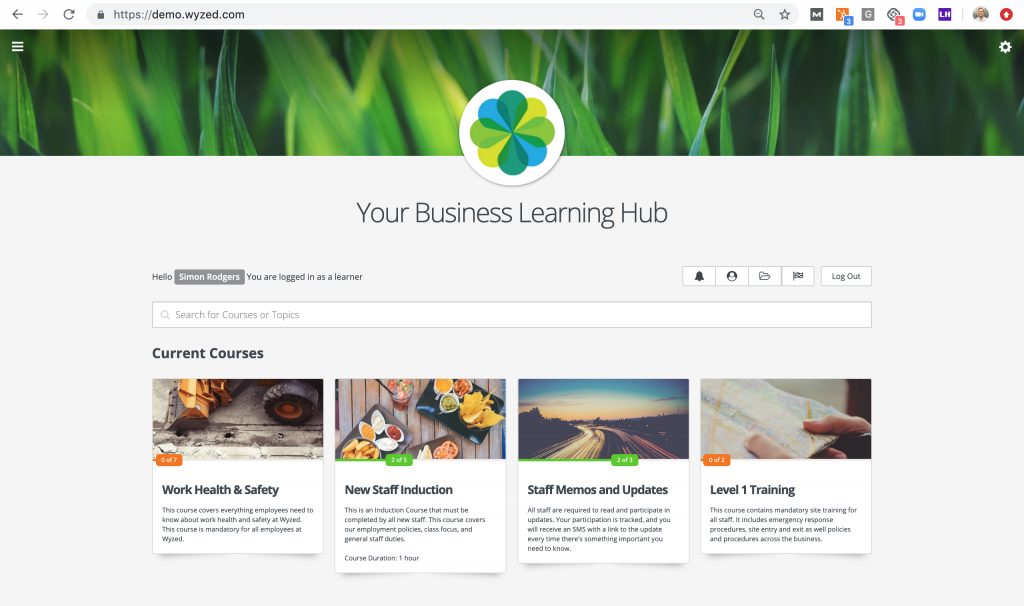
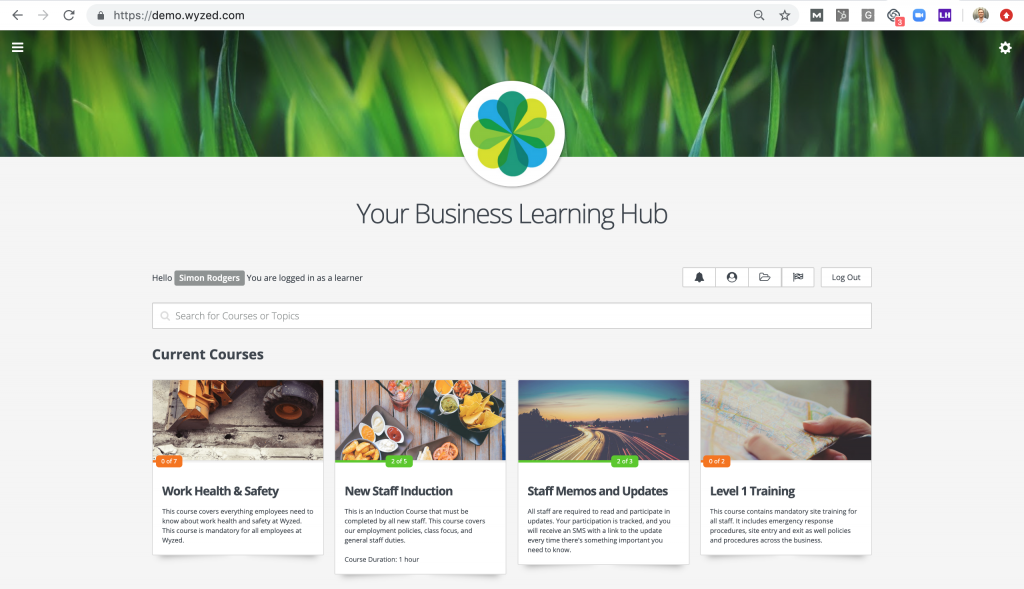
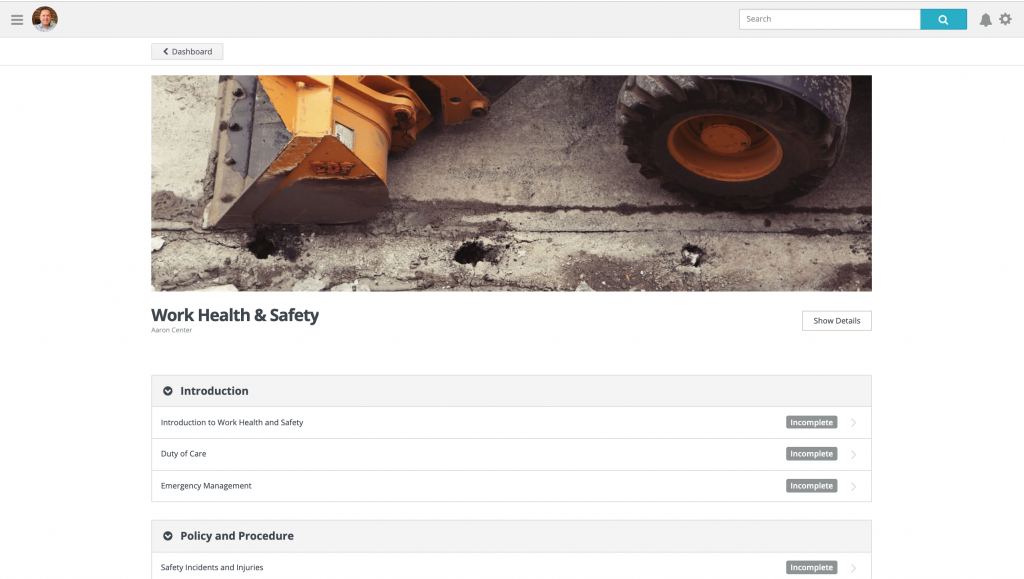
And this is how this structure would look like in real life using a modern online training platform.

In the image below you can see here the Course Heading (Work Health and Safety). The Course Topic (Introduction). The course content/element (Duty of care)

You can see here the course Heading (Work Health and Safety). The Course Topic (Introduction). The course content/element (Duty of care)

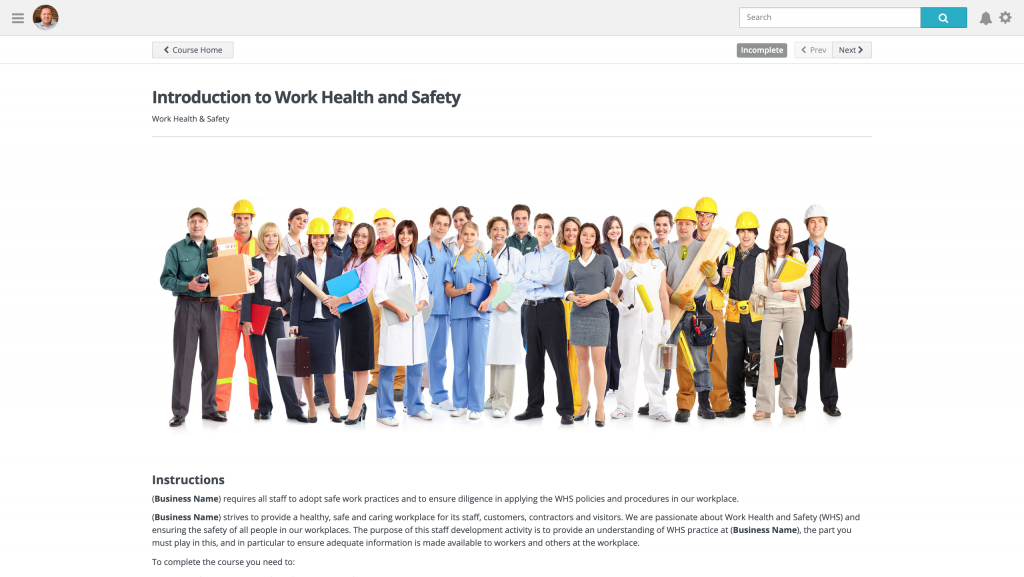
In the image below you can see all the content or elements that make up the learning (images, text, video, etc…).

Here you can see all the content or elements that make up the learning (images, text, video, etc...)
Here you can see all the content or elements that make up the learning (images, text, video, etc…)


Step 4 – Start building your content

Now we get into the really fun stuff, and the part that most people jump to when they create their courses, but not you though! 

Now we know what our content needs to convey, who it needs to convey to, and a good skeleton of the types of content that will all come together in the right order to help us build the best courses possible! 

This step is highly creative and no two courses are identical, but we want to provide some suggestions and thoughts as to how you can go best go about this process.

Walk before we run!

Often when we work with clients, they have grand visions of videos everywhere, with workbooks, custom pictures, animations, and so on and so forth. 

But in reality, they may only have word documents, a few older training videos, and some ideas on the multiple choice questions they want to ask as a starting point.

For every business, the initial course might be different, but I suggest to clients to use what they have and focus on developing what they absolutely need to get the course up and running. 

From there, and with all that time you’re saving on training, you can use it to reinvest back into creating new and highly engaging content to either swap out old content or continue to build upon your already existing/new courses.

Use Higher-Order Thinking

Very similar to Step 3, we want to continually make sure that we are engaging Bloom’s Taxonomy and working towards higher orders and levels of thinking through the creation and arrangement of content. 

You might not get to the desired level right away, but it’s always important to have those principles in mind to ensure that our courses are providing maximum effective transfer of learning between the LMS system and our learners.

Bring in Social Learning

Even though your learners may be learning on their own through the LMS system, doesn’t mean that we cannot look at getting them together in a virtual environment to engage in some social learning. 

Because let’s face it, things are always done better together, right?

So look at using social media tools, forums, discussion boards, etc to allow your learners to share experiences, insights, their own understanding, and takeaways from the lesson. 

These are also a wonderful area to find feedback as learners might not feel comfortable providing learning comprehension feedback on their own, but might be more willing to share as a group. 

We always encourage https://www.wyzed.com/wp-content/uploads/2022/07/staffdevelopment-768×407-1.jpegistrators and trainers to keep an active eye on these groups to join in on the conversation and encourage further discussion on certain topics.

Step 5: Test / Seek Feedback / Revise

Phew, we’ve made it this far and we’re almost done. 

So far, we’ve looked at our learning objectives, understood our learners, mapped out our courses, built the content and arranged our courses.

But alas, we’re not quite done yet. Because once you’ve build out all your courses, we need to constantly make sure that our courses are achieving our expectations/objectives as developed in Step 1

We will also need to make sure that we are adapting to our learners as they, and their role, evolves. 

And of course, taking time to ensure that we are building new and fresh content to help make sure everything is up to date and relevant. 

How to get feedback and revise your course

We encourage all clients to build in surveys into courses, as well as review the course every 3-6 months to make sure that everything is up to date. 

Nothing is more frustrating to learners than information and content that isn’t relevant, so a few minutes every few months can go a long way to make sure that our courses is still packing the educational punch we intended it to. 

At the end of the day our learners, our courses, our trainers, our LMS, and us are always evolving and growing.


What Next?

Now it’s practice time, and start creating your content

If you don’t have a system for creating online courses, you can get started for FREE with a simple, easy to use LMS right here.

And if you have any questions, please feel free to reach out to myself at dustin@wyzed.com

Thanks for reading!

What is an LMS?

Alright, let’s get back to first principles, peel back the jargon and ask the question;

“What is an LMS?”

While a few years ago, LMS was a relatively niche part of the market, it’s now projected that 98% of companies plan to use an LMS by 2020.

This resource is designed as an introduction to the LMS system that will answer:

  1. What is an LMS?
  2. What is an LMS used for?
  3. What makes a good/bad LMS?
  4. How do I choose an LMS?

A screen shot of a modern LMS platform
A screenshot of a modern LMS. Users can login and complete online courses on any device.


What is an LMS?

So let’s start with the basics and ask the question, what does LMS stand for?

Well, LMS stands for Learning Management System.

And a Learning Management System is a software application for managing the delivery and tracking of online learning and online training.

More specifically “the https://www.wyzed.com/wp-content/uploads/2022/07/staffdevelopment-768×407-1.jpegistration, documentation, tracking, reporting, and delivery of educational courses, training programs, or learning and development programs.”

The Learning Management System concept emerged directly from e-Learning.

So in other words, an LMS is an online software that you can load content in to, and use to train different groups of people (employees, customers, partners) for a variety of different purposes (Team growth, compliance, safety, productivity gains, business automation etc.)

If you’d like to have a go at using a simple yet modern LMS yourself, you can try Wyzed LMS for free here.

And if you need help with anything you can follow this guide to creating your own online course (in 5 simple steps) right here.

What is an LMS used for?

But before we get too far ahead of ourselves, let’s ask another really important question;

What problems does an LMS solve?

AND

What do businesses use an LMS for?

Well, quite simply, have you ever needed to get information from one person(s) head to another person(s) head, then an LMS is a possible tool for you.

In any business operating today, no matter the size or industry or service, passing along knowledge between stakeholders lays at the core of any business.

Here are some examples:

  • Teaching employees new skills and critical business processes
  • Training contractors/outsourced individuals on your procedures or processes
  • Training customers and clients on how to use our products or services
  • Providing training as your core business (Training Centres, Universities, Coaches etc.)

Now, the thing is that these challenges have existed since business was even a thing.

And over the years people have used the tools available to them to accomplish these tasks.

But really for the last few hundred years, things haven’t changed much.

Businesses have traditionally used face to face 1:1 on the the job training, using written documents and clunky spreadsheets to deliver and keep track of it all.

To better understand today’s LMS platforms, let’s take a quick trip through the history books to see how we got here today.

A Brief LMS History

The early days…

Interestingly enough, some of the earliest forms of distance education, similar to the principles behind modern LMS, actually dates back to 1723 when Caleb Ogillips, a professor of shorthand, offered teaching materials and tutorials in the Boston Gazette.

This sort of distance education training evolved ever so slightly with the new emerging technologies of penny post service and varied across a range of courses and teachings offered by various individuals over the next few hundred years.

eLearning as we more closely see it today, really began to emerge in the early 20th century. Early appearance of audio-video communications systems were used for remote teaching. And in 1909, Edward Morgan Forster published his story, ‘The Machine Stops’ where we explained the benefits of using audio communication to deliver lectures to remote audiences.

This further evolved as in 1970, Sidney L Presset developed the first teaching machine which offered multiple types of practical exercises and question format. Then, as the format grew, Professor M.E. Zerte transformed this original machine into a problem cylinder able to compare problems and solutions.

But all of this, while bears some similarities to the aspects of modern LMS systems, is still missing two critical aspects – that of the computer and the internet.

The next big change (computers!)

In the 1980’s, this all began to change though as computers became ever more available in daily use in higher education institutes.

It was quickly understood how this new technology could transform how technical and educational information was transmitted to students for learning.

Between the 1970s and 1980s, educational venues were quickly considering the idea of computerising courses.

And with the computer firmly established as the new frontier of learning, the way was paved for the final iterations before we find today’s modern LMS software.

The 90’s – early 00’s…

Early on in this period, there were broadly descriptive terms for this such as computer-managed instruction(CMI), and integrated learning systems (ILS), computer-based instruction(CBI), computer-assisted instruction (CAI), and computer-assisted learning (CAL).

These terms really just describe early iterations, but it wasn’t until FirstClass developed by SoftArc, that things really catch up to what we know today. FirstClass was originally used by the United Kingdom’s Open University in the 1990s and 2000s was used to deliver online learning across Europe being one of the earliest internet-based LMSs.

From there, it was a quick hop and a skip to the first real proper, and fully featured LMS system  called EKKO. It was developed and released by Norway’s NKI Distance Educational Network in 1991.
This quickly caught on, and in 2000, the University of Zurich revolutionized the concept of digitised learning by introducing the first open source LMS called OLAT.

Once that was done, Microsoft developed the first SCORM-certified learning suite SharePoint.

Today and beyond…

Once this milestone was achieved by Microsoft, LMS  as we know it today has rapidly evolved in the way that content is created, how these systems integrate with our ever-digitised workplaces, and more detailed features and benefits to suit our modern workplaces.

Modern Features (How an LMS actually works)

So, let’s go back to an early part of our conversation when you might have wondered “how do modern LMS systems help me train people?”

Well, each one has its own unique features and benefits but we can still divide them into a few categories to help us narrow down which of these tools different LMS systems work. And of course, help us choose which one is best for us.

Firstly, let’s explore some important aspects to ensure that you get the best system.

Scorm vs Non-Scorm

If you’ve done any research, or spent much time exploring the world of LMS, one term you’ll have come across, and something even mentioned earlier in this article, is SCORM.

So, what is SCORM content? Well SCORM stands for Sharable Content Object Reference Model. Basically, SCORM is elearning content that is developed using special software programs and is akin to coding for software. It creates specific learning content that can be used across any LMS software that uses SCORM.

Now, there is a lot more to this, but one of the advantages of using SCORM is that it allows you to easily use SCORM content across different LMS platforms that support the SCORM format. This makes changing platforms really easily and ensures that you don’t need to recreate new content if you move to a newer or better platform.

However, it does come with it’s own set of tradeoffs. The biggest one is that creating SCORM content on these special programs requires special expertise and knowledge. You will need to find a professional who has experience developing this type of content and that can make it very expensive and time consuming to create.

On Premis vs Cloud

We’ve all heard about the cloud right? Has anyone found the cloud yet? Haha, just kidding.

But it is important when you’re looking at LMS systems to know the difference.

Essentially, an on-premise solution is where you house the software on your own servers.

These servers are usually tucked away in some room in your office whirling away!

This makes it nice and secure where you can control who has access to your LMS system but, like SCORM, it requires professionals to be able to set up and maintain this type of system.

On-premise can also be more expensive as often there is a larger upfront fee to set the software up for your needs and more work to maintain new features that the software provider might launch to keep things fresh and modern.

Whereas Cloud, everything is handled on remote servers that whoever you’re purchasing the software off of, manages for you.

So you just login in, and off you go.

It means that you don’t need to worry about speed issues, updates are done automatically, and these systems are often priced on a per user basis which makes things a lot simpler!


A modern LMS where users can access online courses on desktop, ipad, and mobile devices.
Modern LMS’s are increasingly cloud based, meaning users can access their content on any device anywhere, at any time.


eLearning Design Elements

So, as we’ve already talked about, modern LMS allow you to create online courses your learners to go on and complete learning objectives.

Let’s look here at non-SCORM software given that they are the way of the future!

Most modern LMS systems will give you a range of elements to create your courses when completing instructional design.

Elements is just a fancy way of talking about the different building blocks these different softwares will provide you to assemble your courses with.

While different systems will offer different options, common examples of these elements include:

  • Multiple choice quizzes
  • Videos
  • Inserting text
  • Pictures
  • Providing a space for learner to upload content into your system
  • Forums/Discussions
  • And many many more!

By combining different elements together, you can create courses as different and unique as you require to teach and train to your objectives.

The art and science behind the combination of these different elements is called Instructional Design and is worthy of a whole library of resources on what to do, and what not to do.

You can use an LMS to create online learning with a wide range of content types.


Managing your users/learners online

Of course, at the core of any system, no matter how you’ve arranged the learning elements together in your courses, the user is really the heart and soul of any system.

As mentioned before, often in LMS systems, users are referred to as learners given the nature of what the user is pursuing in your LMS system.

Typically, there are 4 different types of users that you might find in your system.

1. Super User/Master User: Usually this is the person who has total control over the entire system and helps to maintain the high level access and functions of your LMS systems for security and convenience factors.

2. Administrators:The second type, are users setting up your courses and managing the https://www.wyzed.com/wp-content/uploads/2022/07/staffdevelopment-768×407-1.jpegistrative side of your system. These individuals might be HR, Sales Managers, Instructional Designers, Learning & Development Professionals, subject matter experts, and anyone else who can chip in to help build and maintain your system.

We often encourage our clients to make sure that they bring in, and leverage, a rich collection of individuals from inside and outside of your organisation to help build and maintain your system.

This diversity of background and experience will help to make sure that the content is rich, meaningful, and can be tailored to achieve the learning objectives of the learners who will be going through and consuming the course content.

3. Training Facilitators:The next type of user you might find might be managers, trainers, or individuals who are helping to facilitate the training. These types of users may have different levels of access or oversight as you tailor your LMS based on it’s configurability. Often these users will track your learners as they complete courses to make sure everyone is on track with all their learning objectives. Think of them like a virtual teacher kinda thing.

These users are integral to help ensure that the learning is smooth, impactful, and provides a conduit for a blended approach to learning that can be a great recipe to ensure that the learner absorbs and understands the content to the maximum potential.

4. Learners: And of course, the learners themselves. These are the individuals who are going through to consume the content. The ones who are watching the videos, reading the text, participating in the forums, and completing the quizzes you have created.

A screen shot of managing online users within the Wyzed LMS system.
A screen shot showing how a modern LMS manages it’s users within the system.


The brass tracks

Wow! We’ve talked about a lot of things here today, but let’s boil this down to a few key questions you need to think about as you look for your very own LMS system.


Who exactly who you’re going to be training and what they will be learning?

Depending on if you need to train external stakeholders, employees, or customers, different features will be more important than others.


What is your, or your team’s, level of expertise using an LMS system?

This one is really important as there are some LMS systems out there that are very complex, or rely on SCORM.

All of which requires special professionals who know how to build and manage this type of learning environment.

Choosing an LMS system that meets all your needs but also isn’t unnecessarily complex is critical to ensuring success.


What types of content you need, or have, that you will use to build out your courses in your new LMS.

Different systems will provide different content types (elements). Often we talk about how the medium (the software) is just as important as the message (the learning) as elements can either enhance or detract from the learning that you want to happen in your system. So choose wisely!


LMS Summary

So there you have it, the 30,000 ft view of the LMS, it’s history, and various uses.

If you’d like to learn more please feel free to chat to any of our LMS business consultants here.

And again if you’d like to try a simple modern LMS yourself you can do so for free here.

6 Common Mistakes When Creating Online Learning

Let’s apply some 80/20 to our eLearning course design, and stop making these 5 common mistakes! (3 minute read)

Photo by Kyle Glenn on Unsplash

Originally posted April 20, 2019: https://elearningindustry.com/creating-online-learning-mistakes-5-common

Creating Online Learning: How Can You Avoid Potential Mistakes?

After 2 years of working with everyone from General Managers, seasoned eLearning Professionals, HR, Sales Managers, and everyone else set out with the task of implementing eLearning in their organizing, I can boil everything down into 6 common mistakes I see.

Avoid these, and you will be on your way to eLearning success!

1. Keep It Simple

I get it. Creating courses to educate and inspire your audience can be very exciting, and it’s easy to feel all fancy and get fancy with your online learning. But here’s the thing, it doesn’t work.

Now, I’m not saying to not take pride, not innovate, and try things outside the box as you craft your learning, but I implore you to keep it simple!

At the end of the day, creating courses using eLearning should have a clear goal—to educate. And everything that doesn’t add to that, takes away from it—being unnecessary complexity of information as an example.

When I work with professionals through this process, I ask them one question; “What will your learners be able to do after completing this course?”

Everything else, no matter how pretty or cool that doesn’t support that question needs to be turfed!

2. Not Enough Repetition

The human brain is an incredible device capable of recalling and synthesizes amazing feats. But, in our everyday world, that poor brain has a lot to contend with for attention and bandwidth.

So, to not only craft the best learning but also make sure it sticks is to ensure that you repeat things at least 3 times throughout the learning process.

Repeat things 3 times.

Repeat things at least 3 times. See how well that worked.

Of course, it all depends on what tool you’re using΄. Does it include:

  • Text for people to read?
    Try including instructions or something to set up the learning they’re about to go through.
  •  A video, auditory, or another visual medium?
    This is where bulk learning will happen for that particular topic or idea.
  • A summary, recap, or essay/multiple choice questions?
    This is where the person can process and recall the information to start to enforce the brain’s pathways relating to that new knowledge.

An easy way to create meaningful, repetitive material without it being intrusive is to frequently recall and bring different learning concepts together to form a bigger. This allows you to repeat things time and again to really hammer it home.

3. It’s Too Loooong!

Look, our attention spans suck. And the bad news is that it’s only getting shorter. So, when you’re creating your course content, and where possible, try and break it into segments that are no longer than 10 minutes in length. And in between those segments, you can include soft breaks which allow the learner to feel refreshed but also keep them engaged.

If they disengage, then we start to jeopardize the learners’ experience and potentially losing them to those white sneakers sitting in the corner that might need a cleaning (they do not need cleaning though!).

The best strategy to avoid topics and courses getting too long is to plan out beforehand. This will give you the time both to zoom in and zoom out on the content to ensure that it’s a structure in a logical way, and one which supports the best outcome for our learners.

4. Not Knowing The Audience

We’re all guilty of this, myself included. We create content that looks amazing!

It’s slick and sexy with all the bells, whistles, and those sweet buzzwords.

But here’s the thing, we’re not creating the content for us, we’re creating it for others. So, some important questions that need to be asked are:

  • What is our audience’s education level?
  • What is their role/job?
  • What is their level of comfort with technology?
  • Where is this learning going to happen? (i.e. in an office, on a noisy job site, at home, etc)
  • What type of learning might need to be combined to reinforce the eLearning experience?
  • And more related to understanding who will be doing the learning and whatever else they may need to be successful.

5. Leverage The Learner’s Own Experience

One of the most overlooked opportunities in eLearning (and learning in general if I’m honest) is opportunities for the learner to bring in their own shared experience as it applies to whatever they’re learning.

Doesn’t matter if it’s a new skill they’re getting or an old skill they’re leveling up in, leveraging their own experience can be a critical link to for the learner to be able to have greater retention as well as go beyond the obvious training objective.

Some strategies that have worked well for clients are:

  • Getting the learner to share their own experience about a certain situation (i.e. safety, bad customer service, leadership, etc) and get them to take the knowledge and mix in the new learning for an enriched experience.
  • Getting the learner to engage in practice runs, trials, or hands-on learning. By combining auditory, visual, and tactile, you can achieve 85% of retention rates.

6. Ask! (Bonus Point)

One of the most common questions I get from clients I work with is “where should I focus my course building initiatives?”.

And my simple answer: “Ask!”. That means ask the management, ask your clients, ask your suppliers, and ask the learners what they need and how they think they might be best engaged. Often they will tell you exactly what you need and get you at least 50% of the way there.

The Conclusion

I’ve seen these mistakes thousands of times, and everyone (absolutely every client ever!) makes their own decisions to restructure their content to be in line with the above principals.

The moral to the story? Save time from the get-go, and stick to these core course creation principles, and you’ll be on your way to eLearning (or any learning) success.